

Stacey Scheffer, May 2025
Mastering the Craft of Candle Wick Testing

Candle testing is a careful process that takes time and attention, but the results are definitely worth it. When making candles, the wick is key to how well the candle burns and how much scent it gives off. Each phase of wick testing involves checking different factors like the wick size, the way it burns, and how much fragrance is released. It’s important to watch for things like the size of the flame and the evenness of the burn to ensure that the candle will work well. By understanding this process, whether you want to try making candles yourself or simply appreciate the craftsmanship behind your favorite home fragrances, you’ll gain insight into the hard work that goes into creating each candle.
This knowledge not only helps you choose the best candles but also honors the effort that goes into making these lovely products.
How It Begins

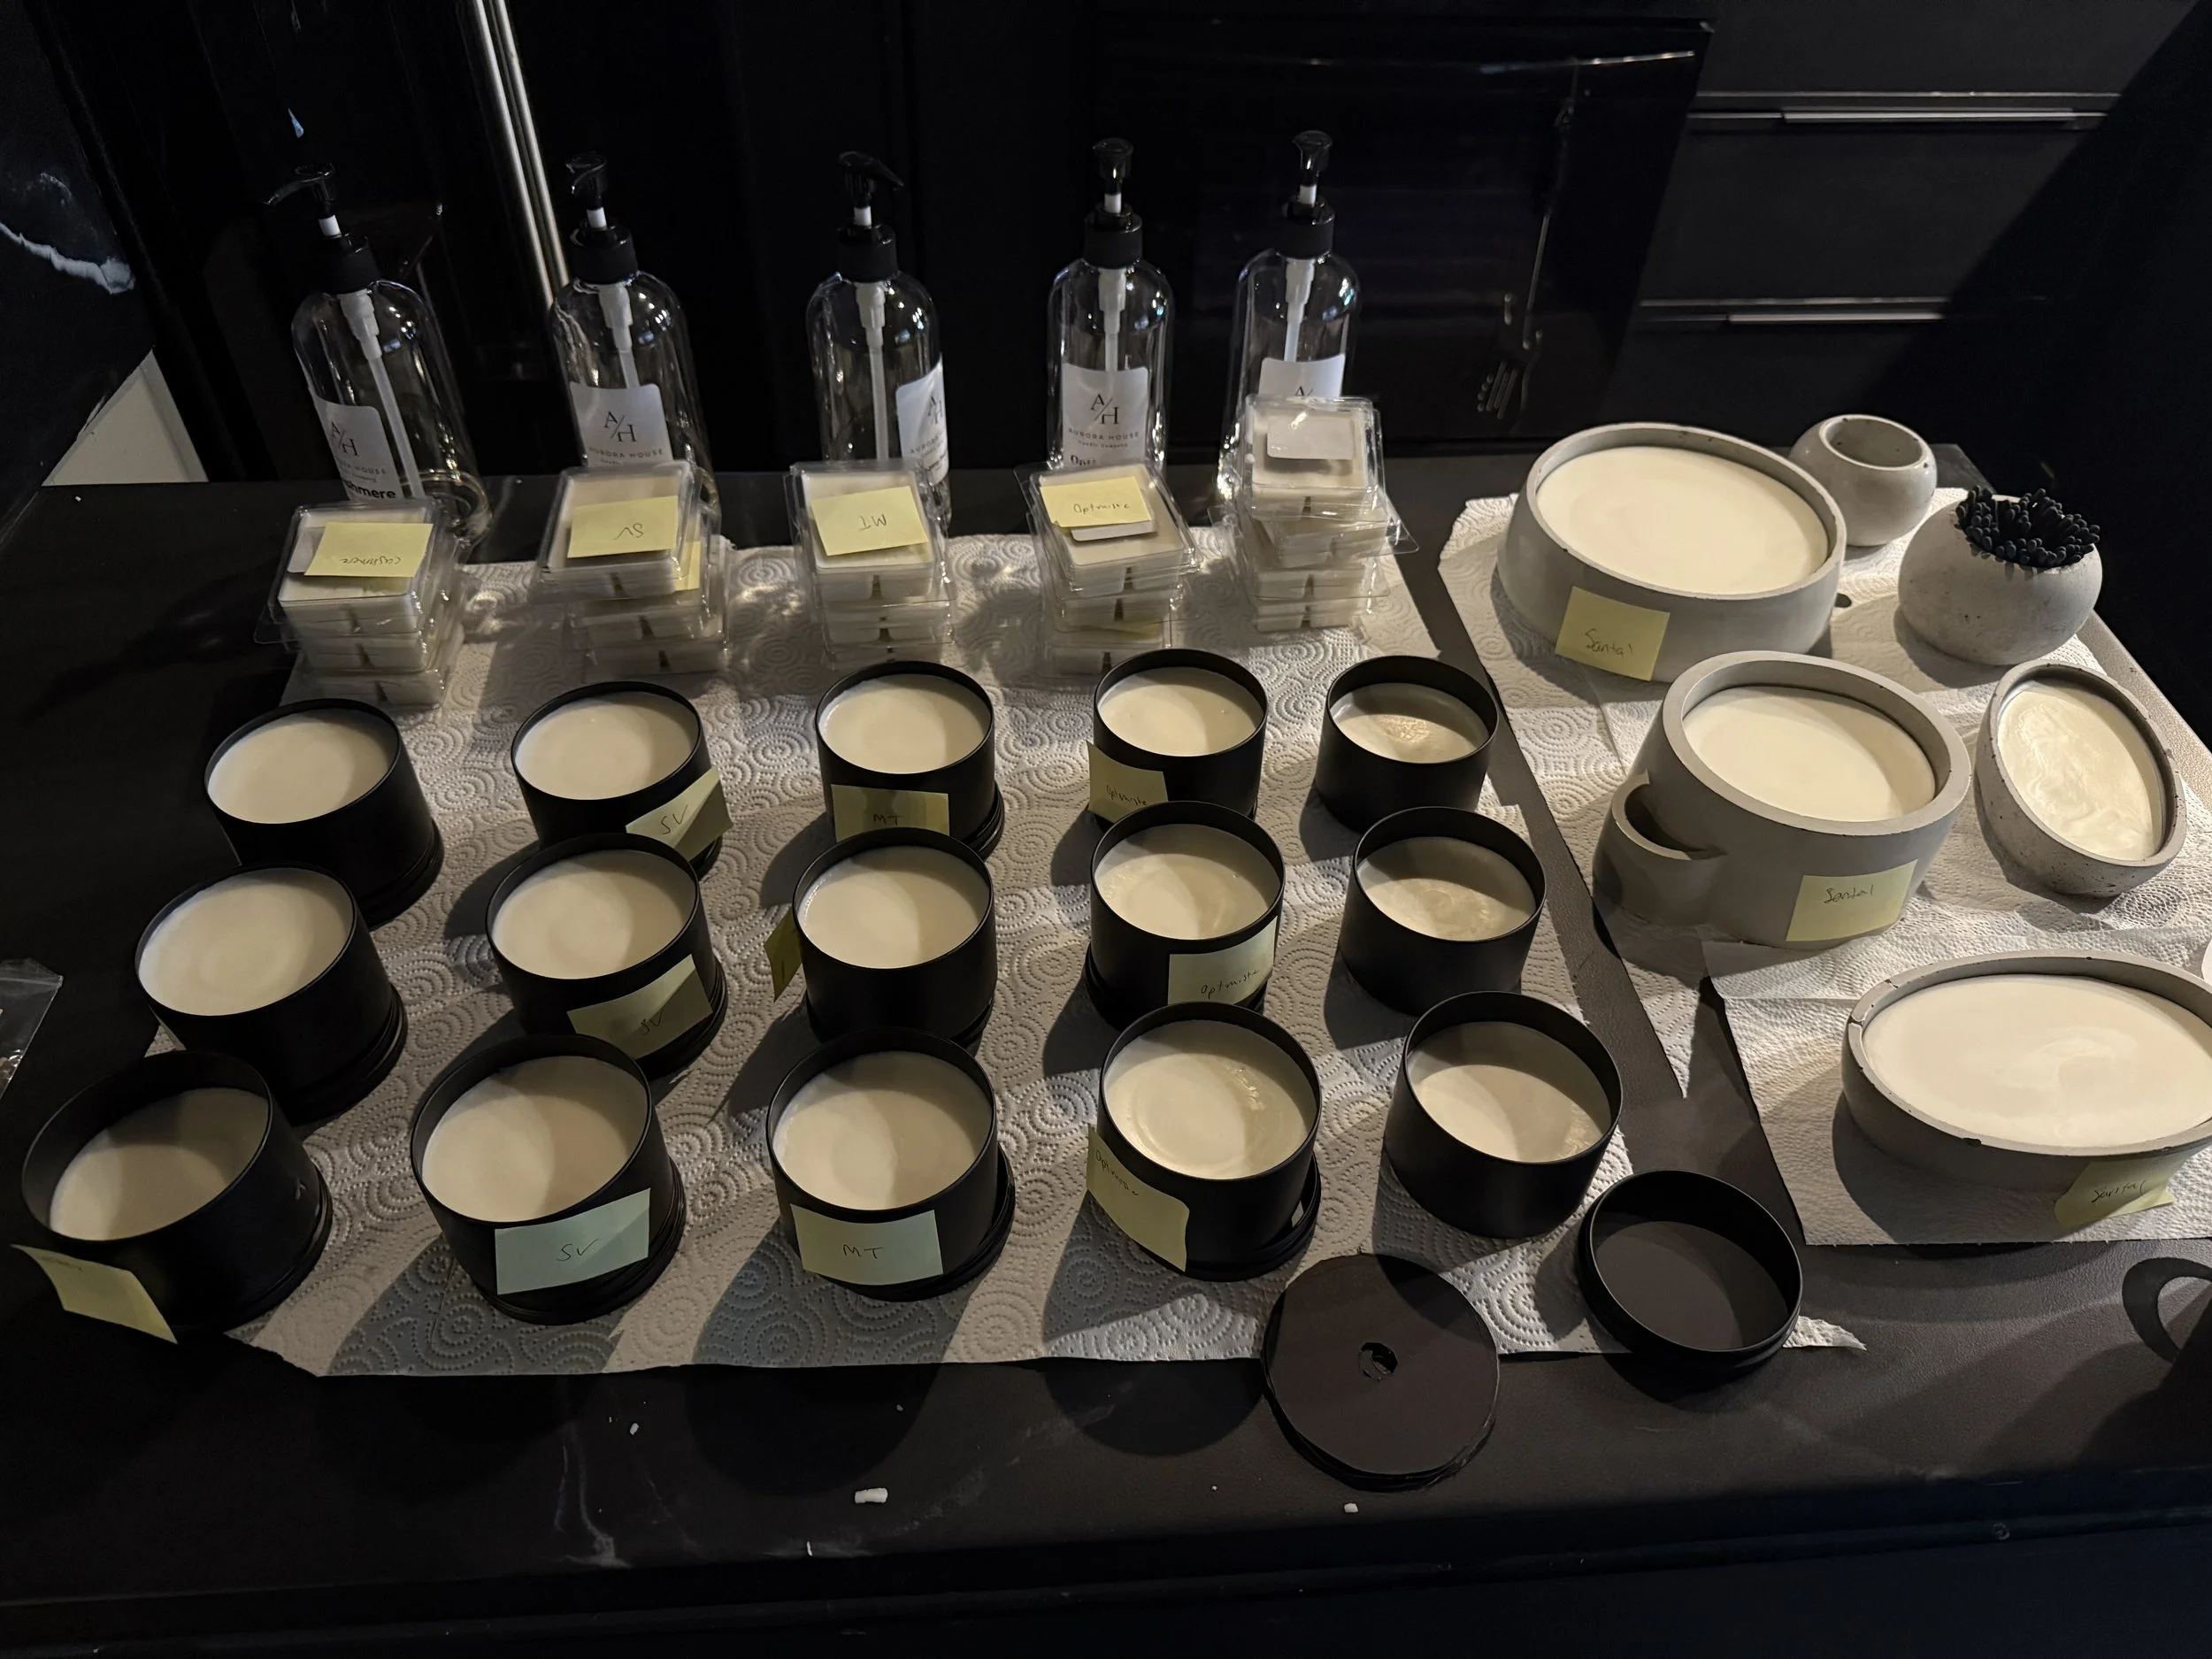
I'll begin my candle-testing journey with a basic vessel, specifically our 8oz aluminum tin, which is round and uncomplicated, making it a perfect starting. This small tin is not only lightweight for easy transport but also economical, allowing for easy testing without breaking the bank. To kick things off, I typically choose a base fragrance, often selecting my most popular scent. I prepare enough wax to fill around 8-10 of these tins. Interestingly, I won’t add wicks to the jars at the very start; this approach allows for better control over the final product and ensures an even burn later on. By focusing on these foundational elements, I can create a quality candle that embodies both simplicity and charm, appealing to both novice and seasoned candle enthusiasts alike.
After I have poured the candles and allowed them to set for 3-5 days, a delicate anticipation fills the air as I prepare for the next step of my candle-making journey. Gently, I take a skewer and poke a small hole in the center of each candle, creating a perfect little pocket to insert the wick. I typically begin my testing process with 4-6 different wicks. They may all come from the same brand or differ in type. If I opt for a consistent brand, I carefully consult their wick guide to ensure I choose the appropriate size based on my vessel’s dimensions, usually measured in inches.

This method of wick placement allows me to use a single can for multiple wick tests
ANTICIPATION BEGINS….
With my preparations in place, I’m excited to light the candles and observe how each wick performs, ready to discover which one will create the ideal burn. To ensure accurate testing of the candles in my collection, I'll begin by setting up an experiment in a controlled area of my home. This designated space will be free from distractions and variables that could skew the results, such as high traffic, windows, and minimized airflow from doors, fans, or air vents.

Each candle will be burned for a maximum of four hours, adhering to safety recommendations to avoid extended burning. During this period, I will closely monitor their performance, noting any that fail to meet quality standards before the time is up. Those that extinguish too early or burn unevenly will be disqualified before the full 4 hours. This careful approach allows me to gauge each candle’s burn time, scent throw, and overall behavior, ensuring that I can select the best options for my products and create a pleasant, aromatic atmosphere.
To ensure accurate testing of the candles in my collection, I'll begin by setting up an experiment in a controlled area of my home. This designated space will be free from distractions and variables that could skew the results, such as high traffic, windows, and minimized airflow from doors, fans, or air vents.

When creating candles, it’s crucial to recognize that not all wicks harmonize effectively with every fragrance and wax combination. The wick that I envisioned as the perfect match for one scent may struggle to deliver the same performance with another, even within the same type and size of vessel.
"Every candle test is like a whiff of possibility; it reminds us that even the faintest flicker can lead to the brightest scent-sation."
While it may be more convenient for a business to standardize wick types and sizes across multiple candle lines, pursing this path can compromise the overall burning experience

To navigate this challenge, I will conduct comprehensive tests for each fragrance, employing the same meticulous approach I used in my initial wick trials. However, I’ll leverage the insights gained from those first experiments to inform and refine subsequent tests. While it may be more convenient for a business to standardize wick types and sizes across multiple candle lines, pursuing this path can compromise the overall burning experience. Ultimately, each candle deserves careful consideration to ensure that it burns beautifully, releasing its intended fragrance in the best possible way, underscoring the importance of thoughtful experimentation in the art of candle making.
Once I have nailed down the wick for each fragrance in the 8oz vessels, the next step is testing the compatibility with various vessel types. The testing guide from wick manufacturers serves as an invaluable resource, detailing how different materials interact with heat. For instance, glass vessels conduct heat differently compared to metal or concrete options, often necessitating adjustments in wick size to optimize performance. This is crucial, as the wick's behavior can drastically affect the scent throw, burn rate, and overall experience. Additionally, the guide includes recommendations tailored to different wax types, whether it's paraffin, soy, or coconut, each of which has unique melting points and burning characteristics. Carefully considering these guidelines ensures that each candle not only burns beautifully but also delivers its intended fragrance effectively.
By meticulously testing each combination, I aim to perfect the balance of aroma and burn quality, ultimately creating the ideal candle.
Creating the Ideal Candle Burning Experience
To create an ideal candle that burns evenly and effectively, I'll use the 8oz jars as a reference point for larger vessels that might require multiple wicks. Typically, a single wick should adequately cover about a 3-inch diameter, and it should be positioned at least 2 inches from the vessel's sides to ensure optimal performance. To streamline my process, I plan to cut out a template based on the dimensions of the 8oz jar, which I will then arrange on a larger template made from each of the larger vessels I intend to test. This method will allow me to visualize the placement of potential wicks and help determine whether I need to use 2, 3, 4, or possibly even more wicks for each candle.
By carefully assessing the wick configurations, i can create candles that burn reliably, providing a perfect balance of light and fragrance for each size vessel.
When conducting wick testing for candles, I aim to evaluate several key factors to determine whether a wick has “passed” or “failed." The flame size is my primary focus; an ideal candle flame should measure between 3/4 inch and 1 inch in height. If the flame is too small, it may indicate a small wick size and not melt the wax evenly, while a flame that is too large for an oversized wick can result in excessive heat, potentially leading to safety hazards. Additionally, a stable flame is crucial; it should burn steadily without flickering or producing smoke. These features serve as significant indicators of whether the wick size is appropriate for the candle vessel.


If issues arise during testing, it's essential to analyze whether the problem lies with the wick itself or may stem from the wax or fragrance oil used. By carefully observing these aspects during the testing process, I can make informed adjustments to optimize the candle's performance and overall quality.
Second, Im looking at the wax performance. Is it tunneling, not melting evenly, is wax gathering on the size of vessel and not melting with the rest of the candle. Those are issues regarding the wax itself or the pouring technique. Tunneling is a fairly common issue with soft waxes like coconut and soy. A commonly used remedy for this is to poke holes around the candle after it has set and remelt the wax using a heat gun to fill the air holes. Wax gathering on the size of vessel can be caused by the hot wax being poured into a cold vessel. I will often place glass and metal vessels on a heating pad for 30 minutes prior to pouring to remedy this. Of course, a poor scent throw or uneven burn is important to monitor for as well.

Candle testing is a careful process, but the results make it all worthwhile. It takes time to plan and take notes, which are very important in figuring out how each candle can work best. Cutting corners is not an option when creating candles, as each detail matters. It’s also essential to do tests again from time to time because the materials from different suppliers can change. By re-testing, you make sure that the candles continue to meet high standards. A lot of effort goes into making the perfect candle so that it smells great and burns well. This attention to detail ensures that customers enjoy the best fragrance experience possible. In the end, spending time on candle testing leads to better products that everyone can appreciate, making it a crucial step in candle making. The joy of a beautifully scented candle is worth the meticulous work behind it.
More Questions or Suggestions?
Hours
Monday–Sunday
10am–6pm
Phone
(404) 285-8615
Location
977 Sweetwater Cir.
Lawrenceville, Ga. 30044